Steampunk Shoes
Posted on: March 14, 2012
- In: Art
- 14 Comments
Oh my gosh, I have the COOLEST project for you this time!!!
*SQUEE*
I am applying for the Amazing Mold Putty® Design Team and for my submission, I created this absolutely FABULOUS pair of steampunk boots 😀
Amazing Mold Putty® has quickly become one of my very favorite products ever! You can go to the Amazing Crafting Products® website to view several videos and to learn more about the Mold Putty and the Amazing Casting Resin®, but let me just tell you that you can mold just about ANYTHING! Plus the Amazing Mold Putty® is non-toxic, so you can even use it for preparing cooking projects. It’s even oven safe up to 395 degrees F.
The Amazing® products are also very simple to use which is always a PLUS, and they all cure and are ready to use within approximately 20 minutes. Once you have created a mold of something, you can cast it over and over again for…forever! Pretty cool right? I know!
Check out the Amazing Mold Putty® BLOG for more great ideas!
OK, on to the project. All photos can be clicked to enlarge. You can view the full video tutorial below 🙂
I got this pair of vintage looking boots at my local thrift store because I thought they would be perfect for this project. I SOOOOOO wish they were my size, but alas, they are not 😦
I used the Amazing Mold Putty® to create several different gears, tacks, nuts, bolts and pen nibs I wanted to be able to replicate multiple times. To create the molds, you simply mix equal amounts of Part A and Part B and blend them together until no streaks are left. When it is uniform in color, you push your item to be molded into the soft putty and set it aside to cure for about 20 minutes. Once the mold is set, remove the original and it is ready to use 😀
Once my molds were ready, I used the Amazing Casting Resin® to recreate many, many replicas of my gears, tacks and pen nibs. You need to use the Amazing Casting Resin® in a well ventilated area and be sure to wear rubber gloves at all times. It doesn’t smell very bad, but the package warns you to be safe. The Casting Resin is super easy to use as well. Again mix equal amounts of Part A and Part B, mixie-mixie, pour and let set.
When my cast items were almost set, I removed them from the molds and trimmed away any excess bits of resin before they were hard. The molds stay flexible so it is super easy to remove your cast items even if they aren’t completely set. It is very important you remove the excess bits BEFORE the resin sets. Once it’s cured, it is like hard plastic and trimming it is NOT easy on thicker items. I don’t recommend it… not that I know from personal experience or anything… just sayin’…*wink*
Next came the painting. The Resin is like opaque, white, shiny plastic, so I highly recommend a coat of gesso before painting. After the gesso, I gave everything a coat of black acrylic craft paint and let it dry. Once the black was dry, I used my finger to apply metallic copper acrylic craft paint to some of the cast items and metallic gold to others. You want to use very light pressure here so the metallic paint only covers the raised bits. This allows the black to show through in the recesses.
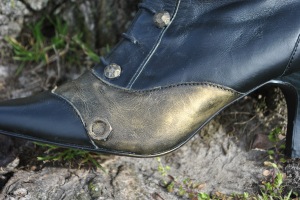
While that was drying I added a coat of gold metallic craft paint to one small section of the boots, again using my finger to really be able to rub and buff the paint. I also buffed a bit of gold craft paint onto the zipper and zipper pull. Be sure to use a very thin amount of paint here so that you zipper still works properly and doesn’t get stuck or gunked up.
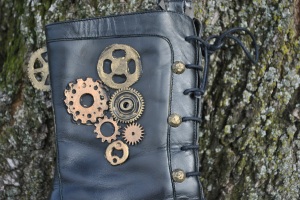
Next I used 3 D Crystal Lacquer to adhere all of my Amazing Casting Resin® embellishments to the boots. I put gears on the side, a bolt and nut on either side of the toe, pen nibs for the heels, and some other nut/bolt steampunk looking thingy above the heels. I also added a gear to the zipper pull with a jump ring and after cutting a large gear in half, I added half to the top, back seam of each boot. The finishing touch was gluing (Crystal Lacquer) tack heads to every other hole for the shoe laces on alternating sides. Viola’!
Every single one of my embellishments was made using the Amazing Casting Resin® and my Amazing Mold Putty® molds.
Can I just tell you how much I wish these shoes were MY SIZE!!!!!! I am soooooooooo going to find me some boots and make a pair for myself!
I am reeeeeeeeally hoping I am selected for this design team because there is SO much more I want to mold! Wish me luck! 😀
Enjoy!
14 Responses to "Steampunk Shoes"
These boots are amazing.. thank for your submission to be on the Amazing mold putty Design team
❤ the shoes!! Hope you make it!
WOW WOW WOW!! THOSE are AWESOME!!! Great job!
Great idea & looks like fun, too! Good luck!
What a fabulous idea and you have done it all so well and so beautifully. Good luck with your entry and thanks for the intro to this awesome sounding product.
Great project!!!! LOVE THOSE BOOTS… so what size are they?
Very best of luck !!! These are amazing….love love love !!!
This is awesome!
[…] Steampunk Shoes from Life, by the seat of my […]
this is on my list of to try….. awsome !!!!!!!!!!!!!!!


March 15, 2012 at 9:01 am
Amazing, Edie!! I love the boots. Such a creative submission – hope you make the team!!
March 15, 2012 at 9:27 am
Thank you!!!