Amazing Mold Putty Pendants
Posted on: April 22, 2012
- In: Art
- 11 Comments
WOW! My first Amazing Mold Putty® design team post! I am absolutely THRILLED to be a part of this design team because I LOVE this stuff.
For my first post I have two projects to share with you. They look very different but the process was the same.
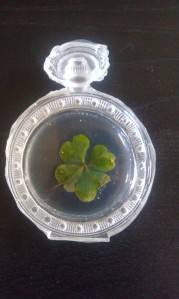
It started when my son found a four leaf clover in our back yard. We wanted a way to preserve it and keep it green, but we also wanted to be able to see the whole cover from both sides. Amazing Mold Putty® and Amazing Clear Cast® to the rescue!!!
FRONT
BACK
I already had a mold for a clock face that my son loved and wanted his clover preserved in, so I mixed up equal amounts of Part A and Part B of my Amazing Clear Cast® and poured it into the mold. After it was set I placed the clover in the center and then filled the well with Mod Podge Dimensional Magic to seal the clover. The best part is that the clover can be seen from both sides and it is preserved forever. I think it’s very cool that my son will have a four leaf clover that he can keep for the rest of his life.
Notice how the light glints of of the Clear Cast 😀
The second project is a pendant that I made using the same basic process bit with a few variations.
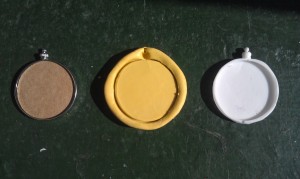
I had a package of those cheapy “make it yourself” pendants and I refused to use the last one because it was the LAST ONE. I mixed up equal amounts of Part A and Part B of my Amazing Mold Putty and before you know it, I wasn’t down to my last one!

I planned on painting this pendant, so instead of the Amazing Clear Cast® I used my Amazing Casting resin® with dries white and opaque. Once my mold was set I painted it black and then covered the inside background with some bits of scrapbook paper and sheet music, then painted the entire inside with Neocolor II water soluble wax pastels.

While that was drying, I drew a little whimsy face and colored her with Prismacolor colored pencils. I also made a paper flower, but it ended up being much too big for the pendant.
I cut out my girl and glued her into the pendant and then I added some glitter and placed a tiny silk flower in her hair. I added some collage with the words “It’s what I do” then I filled the well with Mod Podge Dimensional Magic and let it set overnight.

Now when someone asks me what I do, whether they are asking about work, pleasure or artistic style, I can simply show them my pendant
I hope you enjoyed this tutorial. You can always find lots of great ideas on the Amazing Mold Putty blog.
11 Responses to "Amazing Mold Putty Pendants"
LOVE LOVE LOVE!!
so fun to experiment and just play – your efforts are gorgeous!
I would love to see live or on film how you made the mold for this! I want to make those bezels!
Love it…it turned out great.


April 23, 2012 at 11:00 am
wow! So very cool!!!